

Right, A few months ago I have been creating an Android that manages playlists. Its a simple application that I created just to test passing the objects I defined from one activity to the next. At first I thought...
I'm sure Android handles everything for me...
The answer is....well...not exactly. For this to happen you have to implement an interface called Parcelable. But before we get into that I should first highlight what happens if you attempt to do pass your objects that do not implement this interface. Have a look at this screenshot:
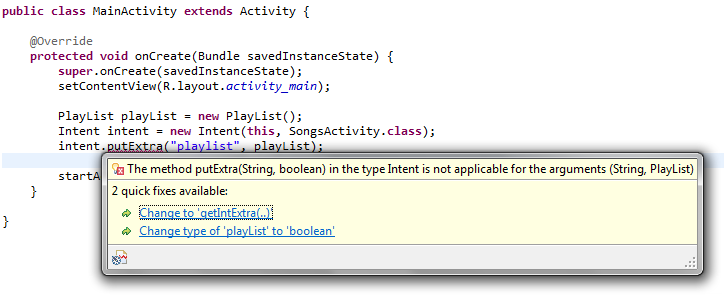
If you look at the dialog, I am attempting to pass an object of type PlayList to SongActivity but its getting mad at me. It thinks its a boolean but then its not. It then suggests I change it to an Integer of which is it not. This is because it doesn't know how to pass this object unless I tell it. In other words, it doesn't know how to encode my object unless I dictate. The Intent doesn't even know of the kind of data my object has. That dictating mechanism is to implement the Parcelable interface.
When you implement this interface you have to write all your class' data inside a Parcel. This is what the Intent use to pass information between Services and Activities. So with that said lets look at our code.
We have two classes in this example. A Song class and PlayList class. Both of these classes have to implement this interface because the playlist class has to put its contents inside a Parcel, and so does our Song class. Remember, every class has to define its encoding (pack) process and consequently must define a way to decode (unpack) itself from the parcel. This is our Song class definition:
package com.parcelableexample.object;

import android.os.Parcel;
import android.os.Parcelable;

public class Song implements Parcelable {
    private String songTitle;
    private long songDuration;

    public Song() {}
    public Song(String title, long duration) {
        this.songTitle = title;
        this.songDuration = duration;
    }

    public void setSongTitle(String title) {
        this.songTitle = title;
    }

    public void setSongDuration(long duration) {
        this.songDuration = duration;
    }

    public String getSongTitle() {
        return this.songTitle;
    }

    public long getSongDuration() {
        return this.songDuration;
    }

    //The unpacker from the parcel (as I like to call it)
    public static final Parcelable.Creator<Song> CREATOR = new Parcelable.Creator<Song>() {

        @Override
        public Song createFromParcel(Parcel source) {
            return new Song(source); //Using private constructor to unpack (Defined at the end of this class)
        }

        @Override
        public Song[] newArray(int size) {
            return new Song[size];
        }

    };

    @Override
    public int describeContents() {
        return 0;
    }

    @Override
    public void writeToParcel(Parcel dest, int flags) {
        //This is where we put this class' attributes into the parcel
        dest.writeString(this.songTitle);
        dest.writeLong(this.songDuration);
    }

    /** The constructor used to unpack the contents of this class that's in the parcel */
    private Song(Parcel source) {
        this.songTitle = source.readString();
        this.songDuration = source.readLong();
    }
}
There are three things to notice about this class.
- You write the class attributes inside the
writeToParcel()method. As you can see my song class has aStringand alongattribute. - I defined a private constructor that unpacks the contents from the parcel that's passed to it. This constructor is used inside the
CREATOR. Now another vital thing to notice about this constructor is that you have to read the values exactly the way you wrote them. If your wrote a string first then you must read a string first - You have to define a
CREATOR(unpacker) variable that implements an inner interface ofParcelable. You will receive an exception if you don't implement it.
Now let's define out PlayList class:
package com.parcelableexample.object;

import java.util.ArrayList;
import java.util.List;

import android.os.Parcel;
import android.os.Parcelable;

public class PlayList implements Parcelable {

    private List<Song> songs;

    public PlayList() {}
    public PlayList(List<Song> songs) {
        this.songs = songs;
    }

    public void setSongs(List<Song> songs) {
        this.songs = songs;
    }

    public List<Song> getSongs() {
        return this.songs;
    }

    @Override
    public int describeContents() {
        return 0;
    }

    @Override
    public void writeToParcel(Parcel dest, int flags) {
        //This is where we put this class' attributes into the parcel
        dest.writeTypedList(this.songs);
    }

    public static final Parcelable.Creator<PlayList> CREATOR = new Creator<PlayList>() {

        @Override
        public PlayList[] newArray(int size) {
            return new PlayList[size];
        }

        @Override
        public PlayList createFromParcel(Parcel source) {
            return new PlayList(source);
        }
    };

    private PlayList(Parcel source) {
        this.songs = new ArrayList<Song>();
        source.readTypedList(this.songs, Song.CREATOR); //This is how the Song class will unpack itself through its CREATOR
    }
}
Just like our Song class, PlayList also has to implement Parcelable. Remember this is the object we will be passing to the next activity. But since it uses another object that we defined and that the OS knows nothing about we had to also implement Parcelable on that class too. If you notice the private constructor of our PlayList class, it reads a list of type Song and we pass the CREATOR (This CREATOR is from the Song class) variable so that each item can unpack itself inside the list too. Now all that's left to do is test our classes. This is our main activity layout which only has a single button to lauch the second activity:
<?xml version="1.0" encoding="utf-8"?>
<LinearLayout xmlns:android="http://schemas.android.com/apk/res/android"
    android:layout_width="match_parent"
    android:layout_height="match_parent"
    android:gravity="center"
    android:padding="20dp" >

    <Button
        android:id="@+id/btn_view_songs"
        android:layout_width="match_parent"
        android:layout_height="wrap_content"
        android:textSize="14sp"
        android:text="@string/songs_loaded" />

</LinearLayout>
Now let's define our main activity that creates the playlist:
package com.parcelableexample;

import java.util.ArrayList;
import java.util.List;

import android.app.Activity;
import android.content.Intent;
import android.os.Bundle;
import android.view.View;
import android.view.View.OnClickListener;
import android.widget.Button;

import com.parcelableexample.object.PlayList;
import com.parcelableexample.object.Song;

public class MainActivity extends Activity {

    @Override
    protected void onCreate(Bundle savedInstanceState) {
        super.onCreate(savedInstanceState);
        setContentView(R.layout.activity_main);
        setTitle("Playlists");

        Button btnViewSongs = (Button) findViewById(R.id.btn_view_songs);
        btnViewSongs.setOnClickListener(new OnClickListener() {
            @Override
            public void onClick(View v) {
                //Hard coding songs
                Song freckles = new Song("Eleven.Five - Freckles (Original Mix)", 360000); //6 minutes
                Song startlight = new Song("Claes Rosen - Starlight (Blood Groove and Kikis Remix)", 330000); //5.5 minutes
                Song goodMorning = new Song("Justin Oh - Good Morning (eleven.five Remix)", 300000); //5 minutes

                //Adding songs to a list
                List<Song> songs = new ArrayList<Song>();
                songs.add(freckles);
                songs.add(startlight);
                songs.add(goodMorning);

                //Adding songs to the Playlist object
                PlayList playList = new PlayList();
                playList.setSongs(songs);

                Intent intent = new Intent(MainActivity.this, SongsActivity.class);
                intent.putExtra("playlist", playList);

                startActivity(intent);
            }
        });
    }

}
As you can see, on our button click event I have put some of my favorite songs (Yes, I love Progressive House :-) ) and added them onto my playlist object. I then pass that object through the Intent object, and since our classes implement Parcelable the compiler won't complain this time around. Okay, Now that we've passed our object to the next activity it's time to retreive it. Here is our songs layout file:
<?xml version="1.0" encoding="utf-8"?>
<LinearLayout xmlns:android="http://schemas.android.com/apk/res/android"
    android:layout_width="match_parent"
    android:layout_height="match_parent"
    android:orientation="vertical"
    android:id="@+id/songs" >


</LinearLayout>
This is our songs layout for our songs activity. We will be listing our songs. We could have used a ListView (in fact we should have used a ListView). That's a tutorial for another day though. This is how our song activity looks like:
package com.parcelableexample;

import android.app.Activity;
import android.content.Intent;
import android.os.Bundle;
import android.view.LayoutInflater;
import android.widget.LinearLayout;
import android.widget.TextView;

import com.parcelableexample.object.PlayList;
import com.parcelableexample.object.Song;

public class SongsActivity extends Activity {

    @Override
    public void onCreate(Bundle savedInstanceState) {
        super.onCreate(savedInstanceState);
        setContentView(R.layout.activity_songs);
        setTitle("Songs");

        Intent intent = getIntent();
        PlayList playList = (PlayList) intent.getParcelableExtra("playlist");

        //Songs container
        LinearLayout songContainerView = (LinearLayout) findViewById(R.id.songs);

        //Lets populate the songs
        for(int i = 0; i < playList.getSongs().size(); i++) {
            Song song = playList.getSongs().get(i);

            LinearLayout songItemView = (LinearLayout) LayoutInflater.from(this).inflate(R.layout.song_item, null);
            TextView songTitleView = (TextView) songItemView.findViewById(R.id.song_title);
            TextView songDurationView = (TextView) songItemView.findViewById(R.id.song_duration);

            songTitleView.setText(song.getSongTitle());
            songDurationView.setText("" + song.getSongDuration());

            //Add the song to the container
            songContainerView.addView(songItemView, i);
        }
    }

}
We use the method getParcelableExtra() for retieving our custom object and yes we have to cast it. The rest of the logic is quite simple. Here is our song item XML definition:
<?xml version="1.0" encoding="utf-8"?>
<LinearLayout xmlns:android="http://schemas.android.com/apk/res/android"
    android:layout_width="match_parent"
    android:layout_height="match_parent"
    android:orientation="vertical"
    android:padding="20dp" >

    <TextView android:layout_width="wrap_content"
        android:layout_height="wrap_content"
        android:textSize="18sp"
        android:textStyle="bold"
        android:textAllCaps="true"
        android:textIsSelectable="false"
        android:id="@+id/song_title"
        android:paddingBottom="4dp" />

    <TextView android:layout_width="wrap_content"
        android:layout_height="wrap_content"
        android:textSize="13sp"
        android:textAllCaps="true"
        android:textIsSelectable="false"
        android:id="@+id/song_duration"
        android:paddingBottom="10dp" />

    <!-- Seperator -->
    <LinearLayout android:layout_width="match_parent"
        android:layout_height="1dp"
        android:background="#aaaaaa"></LinearLayout>

</LinearLayout>
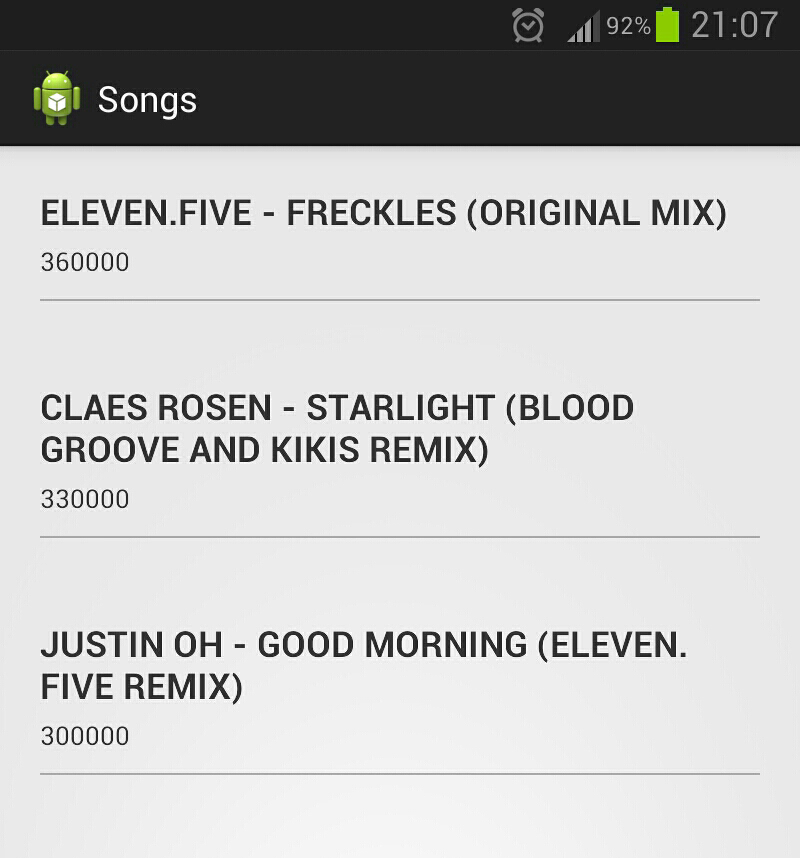
This is the final resulr:
Comments